The Easy Ways To Create Your Own Business Logo – Photoshop Tutorial
Introduce The April Bundle by TheHungryJPEG – A ginormous bundle of fonts and design elements for you to have fun with!
In this photoshop logo design tutorial, we’ll show you the easy ways to create your own business logo with that bundle of design elements.
First, you should have a Photoshop itself on your device. Get Photoshop for free right now and start to create your logo.
Let’s begin!
Before we start, take a look what you’ll be create:

And of course we also need to download some files. All the image and font I use to create this logo are from “The April Bundle” by TheHungryJPEG.
1. Create a Canvas
Step 1
Create a new file by click menu “File” -> “New”

Step 2
Name your file and set the size to 1000×1000 pixels, then click “OK”

Step 3
Now create a guide by click menu “View” -> “New Guide”

Step 4
Set the position at 50% in “Horizontal” and “Vertical”

2. Put an Image
Step 1
Open file by click menu “File” -> “Open”

Step 2
Open folder “The Tribal Watercolor Pack” and choose file “41”

Step 3
Select the image by click menu “Select” -> “All”

Step 4
Duplicate image by click menu “Edit” -> “Copy”

Step 5
Open your first file and paste image by click menu “Edit” -> “Paste”

Step 6
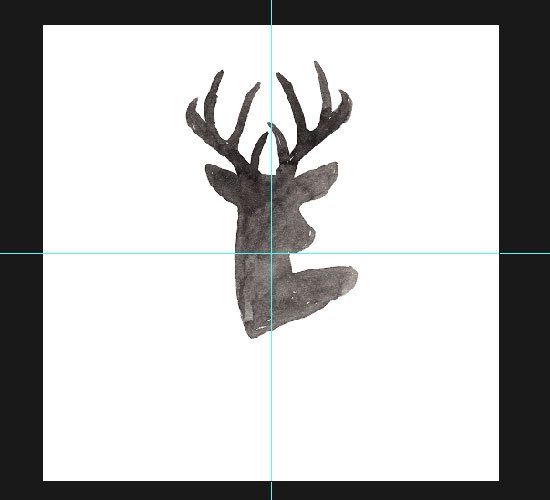
Convert layer image silhouette of deer into smart object by click menu “Layer” -> “Smart Objects” -> “Convert to Smart Object”. We should convert the image to smart object so if we resize image later the image will not lose their real resolution.

Step 7
Resize the image by click [ctrl]+[T] on keyboard. and put at the center of canvas

3. Put all the Element and Reorganize
Step 1
Same process with Put an image step. Open file “54-01” from folder “The Tribal Watercolor Pack” and put the image like at the picture.

Step 2
Put the image file “42” from folder “The Tribal Watercolor Pack” to our canvas.

Step 3
Put the image file “52-01” from folder “The Tribal Watercolor Pack” to our canvas.

4. Add some Text
Step 1
Write somethings at the ribbon with font type “Castellia” with size: 120pt, and color: white (#FFFFFF)

Step 2
Add shadow behind the text by click menu “Layer” -> “Layer Style” -> “Drop Shadow”

Step 3
Fill the Opacity to 50%, Angle: 120, and distance to 5px

Step 4
Click menu “Type” -> “Warp Text”

Step 5
Choose style: Arch, and Bend: +15%


Step 6
Write another text with font type “Broadkast”. size 30pt, and color: black (#000000)

Step 7
Click menu “Type” -> “Warp Text”

Step 8
Choose style: Arc, and Bend: +15%

Great Job! Your logo is ready!
Here the result:

You just learn the easy ways to create your own logo here. With the help of The April Bundle from TheHungryJPEG you also can build the other logos as personal or client projects.
As you can see below with the same techniques above you also can build these logos:


The possibilities are nearly endless. Good luck!
